Part 0 - Pythonista Mode
The basics
Let’s start by using the CLI to create a new application:
anpylar-application --pythonista --tutorial top0
Note
--tutorial provides predefined styles to the app and the argument
--title "Tour of Pyroes" is implicitly added
To get an an empty styles.css file and set the title manually:
anpylar-application --pythonista --title "Tour of Pyroes" top0
Note
Notice the option --pythonista to specify a specific behavior when
generating the skeleton code.
A directory named top0 will be created and populated. top0 stands
obviously for: Tour of Pyroes - Part 0
Note
If a directory/file named top0 already exists, the CLI won’t
do anything
The newly created top0 directory will contain the following files and
sub-directories:
├── app
│   ├── __init__.py
│   ├── app_component.css
│   ├── app_component.py
│   └── app_module.py
├── anpylar.js
├── index.html
├── package.json
└── styles.css
Note
When compared with --htmlista and --selectista … there is no
app_component.html file. The expectation is to make everything in the
code and with the code. No template will be pulled in.
Which will be already functional. With the addition of the --title "Tour of
Pyroes" switch a title will be added to the main component. More on this
later.
Let’s get our hands dirty by serving the application:
anpylar-serve top0
which will output:
Sun Dec 3 08:51:47 2027 Server Starts - http://127.0.0.1:2222
Because no port has been specified the default port 2222. The full URL to
access the sample is displayed, which can be pasted in the browser.
Note
You can also issue a:
anpylar serve --browser top0
And AnPyLar will do everything in its power to open the browser for you
The server takes care already of delivering the index.html file and the
result

Let’s look at the code and how we can modify the title of our application. The
app_component.py contains the following code
from anpylar import Component, html


class AppComponentComponent(Component):
    htmlpath = None

    title = 'Tour of Pyroes'

    bindings = {}

    def render(self, node):
        html.h1('{title}')._fmt(title=self.title)
Have a look at them before carrying on.
Note
The main purpose in the pythonista mode for the render(self,
node) method is to directly create elements and manipulate them as
done in the example. html.h1('{title}') creates the element and
the manipulation is done with ._fmt(title=self.title)
def render(self, node):
    html.h1('{title}')._fmt(title=self.title)
The '{title}' is just like the Format Mini Language Specification. It’s
not actually like, it’s the same. The subustitution is done with the _fmt
method of the supercharged DOM element.
AnPyLar has chosen to shorten the name from format to _fmt, to make
clear this is not the standard Python method (it’s different), but will
perform the same actions.
Prefixing the method with _ has been chosen to make also clear that this is
not a standard method of the DOM element, but rather an extension
If we wanted a different title, it is obvious that we simply have to modify the
attribute title in AppComponent with the desired value as in:
title = 'My Tour of Pyroes'
The project is live and therefore transpilation takes place by simple reloading the page in browser. And the result:

Some explaining
The loading
A simple look at AppComponent and modifying title doesn’t tell us much,
so let’s try to explain what’s happening by first looking into index.html
<html>
<head>
  <meta charset="utf-8">
  <meta name="viewport" content="width=device-width, initial-scale=1">

  <link rel="stylesheet" href="styles.css">
  <script src="anpylar.js"></script>

  <title>AnPyLar Tour of Pyroes</title>
</head>
<body></body>
</html>
As with many other html documents, this one sets the title, some meta values
for the browser, loads the stylesheet, it then loads the needed a script
anpylar.js which sets the AnPyLar machinery in place and will start it.
The execution
If no Python snippets or links to them are specified, AnPyLar will do the following for you
import app

app.AppModule()
This can of course be overridden by the end user by providing specific python
scripts which will kickstart the application. But this matches the code
auto-generated by the anpylar cli.
We have seen above that things are triggered because an instance of
AppModule is being triggered itself, so let’s look into it. One can
obviously find AppModule inside the :file:app/app_module.py (consistent
naming conventions … do actually help)
from anpylar import Module

from .app_component import AppComponent


class AppModule(Module):

    components = AppComponent

    bindings = {}

    services = {}

    routes = {}

    def __init__(self):
        pass
Fairly simple, so let’s concentrate on components = [AppComponent].
This is telling
AppModulethat it should bootstrapAppComponentduring initialization.Note
componentsis plural because it could also be a list/tuple with several items to be bootstrapped during initialization
The rest of items will be needed with more complex setups, but are auto-generated by the cli.
We can also have a look into __init__.py which is the standard entry point
in Python packages.
from app import AppModule
It is simply making AppModule available for the world and specifically in
this case, this is being used in index.html to kick-start the entire
system.
Coming back to AppComponent
Our component has no html code or specific styling built-in, but the project layout shows three files that seem to be related:
├── app
.   ...
│   ├── app_component.css
│   ├── app_component.py
.   ...
And indeed, they are.
Inside
app_component.pywe have definedAppComponent. It could have had any name, but as pointed out above: consistent naming conventions do help!And with the default configuration of our component, the following will happen behind the scenes:
A base filename
app_componentis derived from the class nameAppComponent.The rules are easy: place
_(underscore) signs at the boundary between lower and upper-case letters and then lowercase the resultWhen the component is being loaded:
app_component.csswill be loaded and the resulting styles used inside the component (you can actually find it under the<head>tag, following html standards)
In our top0 tutorial, there are no specific styles for the component and
app_component.css is empty.
Although the example is rather short it already shows several of the powers of a Component when developing with AnPyLar.
Some notes
If you have been working with some other platforms, including angular, you may have noticed a couple of things:
Selector
There is no selector being defined in AppComponent
Actually, there is and you as end user can define it as in
class AppComponent(Component):
    selector = 'my-selector'
AnPyLar tries to make your life easier by auto-generating the
selector if you provide none. See the resulting DOM elements
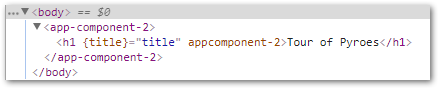
In this case the auto-generated selector is clearly named:
app-component-2. Easy naming. If you wonder why the suffix -2, this is
simply to avoid another AppComponent (which could exist in another .py
file) overwrote our selector, because it will get assigned another -x
Filenames
There is no indication that the html of the component is in a file named
app_component.html (and the same with styles and app_component.css)
Actually, there is and you can change it. Subclasses of Component
inherit two attributes (see the reference documentation) which control
this. They look like this:
class Component:
    htmlpath = True
    stylepath = True
By being set to True the default behavior is to look for the
aforementioned files for a component named AppComponent, but you can
change that by doing this
class Component:
    htmlpath = 'my_app_component.htmlx'
    stylepath = 'mystyles/my_app_component.css'
And those will be the filenames to be fetched. Note how paths and own extensions can be specified. AnPyLar will make no effort to check the validity of those.