Part 2 - List of Pyroes
Editing the name of a Pyro and having it automatically (or is it auto-magically?) in other elements is already a great thing. But a single Pyro would probably neither save the planet nor him/herself.
That’s why the other Pyroes come to the rescue and we need to be able to display a list with all the names to be able to choose which one will be edited.
Copy the top1 folder to top2 and enter it. For example, with:
cp -r top1 top2
cd top2
Note
Under Windows and unless you have a proper shell installed (Cygwin, MSYS, GitBash, …) you are probably better off using the Windows Explorer to make a copy of the directory)
The List of Pyroes
To simplify our approach, we start by adding a mock_pyroes.html file to our
project layout, where we will be holding our list, which will be acting as a
database.
The file structure and the new database-like Python code look like this.
├── app
│   ├── pyroes
│   │   ├── __init__.py
│   │   ├── pyroes_component.css
│   │   ├── pyroes_component.html
│   │   └── pyroes_component.py
│   ├── __init__.py
│   ├── app_component.css
│   ├── app_component.html
│   ├── app_component.py
│   ├── app_module.py
│   ├── mock_pyroes.py
│   └── pyro.py
├── anpylar.js
├── index.html
├── package.json
└── styles.css
from .pyro import Pyro


Pyroes = [Pyro(**x) for x in [
    {'pyd': 11, 'name': 'Pyro Nakamura'},
    {'pyd': 12, 'name': 'Mopynder Shuresh'},
    {'pyd': 13, 'name': 'Pyter Pytrelli'},
    {'pyd': 14, 'name': 'Angela Pytrelli'},
    {'pyd': 15, 'name': 'Claire Pynnet'},
    {'pyd': 16, 'name': 'Noah Pynnet'},
    {'pyd': 17, 'name': 'Pysaac Mendez'},
    {'pyd': 18, 'name': 'Pyki Sanders'},
    {'pyd': 19, 'name': 'The Pytian'},
    {'pyd': 20, 'name': 'Pylar'}]
]
And here the new appearance of the PyroesComponent parts
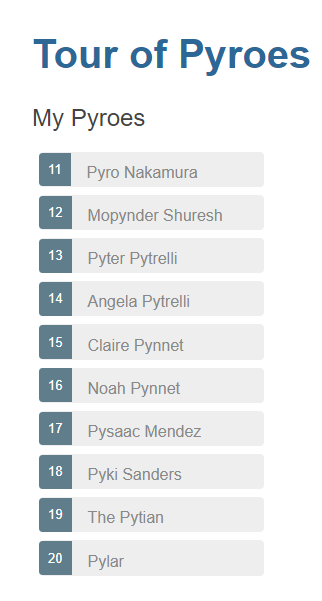
<h2>My Pyroes</h2>
<ul class="pyroes">
</ul>
<div *_display=selected_.pyd_>
  <h2 {name}="selected_.name_.map(lambda x: x.upper())">{name} Details</h2>
  <div><span>pyd: </span><txt [selected_.pyd_]>{}</txt></div>
  <div>
      <label>name:
        <input *_fmtvalue=selected_.name_ placeholder="name"/>
      </label>
  </div>
</div>
from anpylar import Component, html
from app.pyro import Pyro
from app.mock_pyroes import Pyroes


class PyroesComponent(Component):

    bindings = {
        'selected': Pyro(),
    }

    def render(self, node):
        with node.select('ul'):  # find the node where to display the list
            for pyro in Pyroes:
                with html.li() as li:  # create a list item per Pyro
                    # if the selected pyro is this pyro ... set a class attr
                    li._class.selected(self.selected_.pyd_ == pyro.pyd)
                    # bind a click to do self.selected_(pyro)
                    li._bindx.click(self.selected_, pyro)
                    # show the pyd in a <apan> as a badge (child of list item)
                    html.span(pyro.pyd, Class='badge')
                    # show the name as text inside the list item
                    html.txt(' {name}')._fmt(name=pyro.name_)
/* PyroesComponent's private CSS styles */
.selected {
  background-color: #CFD8DC !important;
  color: white;
}
.pyroes {
  margin: 0 0 2em 0;
  list-style-type: none;
  padding: 0;
  width: 15em;
}
.pyroes li {
  cursor: pointer;
  position: relative;
  left: 0;
  background-color: #EEE;
  margin: .5em;
  padding: .3em 0;
  height: 1.6em;
  border-radius: 4px;
}
.pyroes li.selected:hover {
  background-color: #BBD8DC !important;
  color: white;
}
.pyroes li:hover {
  color: #607D8B;
  background-color: #DDD;
  left: .1em;
}
.pyroes .text {
  position: relative;
  top: -3px;
}
.pyroes .badge {
  display: inline-block;
  font-size: small;
  color: white;
  padding: 0.8em 0.7em 0 0.7em;
  background-color: #607D8B;
  line-height: 1em;
  position: relative;
  left: -1px;
  top: -4px;
  height: 1.8em;
  margin-right: .8em;
  border-radius: 4px 0 0 4px;
There have been several changes. Let’s detail some of them:
A stylesheet which is only applicable to the
PyroesComponentThe HTML code has been extended to:
Add the placeholder for the list (a
<ul>element)Embed the editor in a
<div>which has a*_display=...directive which will controlling when the div is shownReferences in the editor now are to a
selected_observableThe Python part:
Defines the
Pyroesinmock_pyroes.pywhich are imported into the componentDefines a new binding
selectedinPyroesComponentwhich is going to hold thePyrowhich is selected from the listThis binding is also used in the HTML code as pointed out above
Builds the list inside
<ul>element, by creating as many<li>items asPyroinstances are present inPyroes
Let’s examine things.
The list
<h2>My Pyroes</h2>
<ul class="pyroes">
</ul>
The <ul> (unordered list) from the html content will serve as the container
for the list.
with node.select('ul'):  # find the node where to display the list
    for pyro in Pyroes:
        with html.li() as li:  # create a list item per Pyro
            # if the selected pyro is this pyro ... set a class attr
            li._class.selected(self.selected_.pyd_ == pyro.pyd)
            # bind a click to do self.selected_(pyro)
            li._bindx.click(self.selected_, pyro)
            # show the pyd in a <apan> as a badge (child of list item)
            html.span(pyro.pyd, Class='badge')
            # show the name as text inside the list item
            html.txt(' {name}')._fmt(name=pyro.name_)
After selecting the element <ul>, a simple loop allows us to create the
list. Let’s look at how observables are used:
li._class.selected(self.selected_.pyd_ == pyro.pyd)A list item (
<li>) will switch on theselectedattibute inside theclassif thepydof the selected Pyro corresponds to thepydof the Pyro during the loop (self.selected_.pyd_ == pyro.pyd)Let’s concentrate on the
self.selected_.pyd_syntax. This says:
Create an observable that will observe
pydinsideselectedeven if the value referenced byselectedchanges.And that’s what we want, because the value referenced by
selectedwill change when clicking on it.If we had written it as
self.selected.pyd_, we would then have an observable to the current value ofpydinselected. It wouldn’t track the changes toselected, but to the current underlyingpyd.
li._bindx.click(self.selected_, pyro)The list item click event is bound to call
self.selected_with a value ofpyro(the corresponding one during the loop)
_bindxis specifically not named_bindto indicate that NO event is going to be delivered to the callback.Should you want to receive the event in the callback, use:
_bindRecall from the previous part of the tour, that: Observables created in the
bindingsattribute are also callables. And that calling them with a value will set the value in the attribute they are observing. When the element fires a click event the following will happenself.selected_(pyro)which is functionally equivalent to:
self.selected = pyroEven if not obvious from the example this has an advantage when using the Observable attribute in
lambdaexpressions.This is valid Python code
lambda pyro: self.selected_(pyro)But this isn’t:
lambda pyro: self.selected = pyro
The editor
The 2nd part of the html content manages the editor with no need for Python code in the component.
<div *_display=selected_.pyd_>
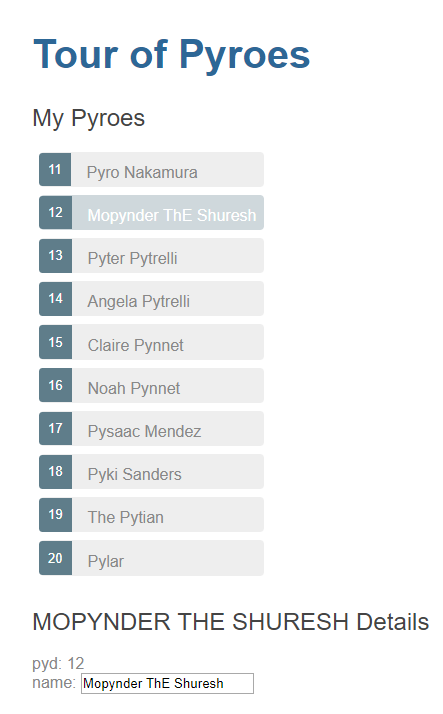
<h2 {name}="selected_.name_.map(lambda x: x.upper())">{name} Details</h2>
<div><span>pyd: </span><txt [selected_.pyd_]>{}</txt></div>
<div>
<label>name:
<input *_fmtvalue=selected_.name_ placeholder="name"/>
</label>
</div>
</div>
All references now are to the observable selected_ and because we know that
is going to hold a Pyro, to the observables inside each instance (namely:
name_ and pyd_)
There is one novelty:
<div *_display=selected_.pyd_>
This would be like executing this code in Python:
with html.div() as d:
    d._display(self.selected_.pyd_)  # display if selected.pyd evaluates to True
The observable self.selected_.pyd_ is being used as a boolean. If the
underlying pyd is 0 the editor will not be displayed. Anything
else will evaluate to True and the internals of _display will make
the d element visible.
Let’s execute
anpylar-serve top2
And go the browser
And our list of Pyroes will be displayed
Clicking on one of the Pyroes will:
Open the editor
Change the class of the selected Pyro so that it becomes highlighted
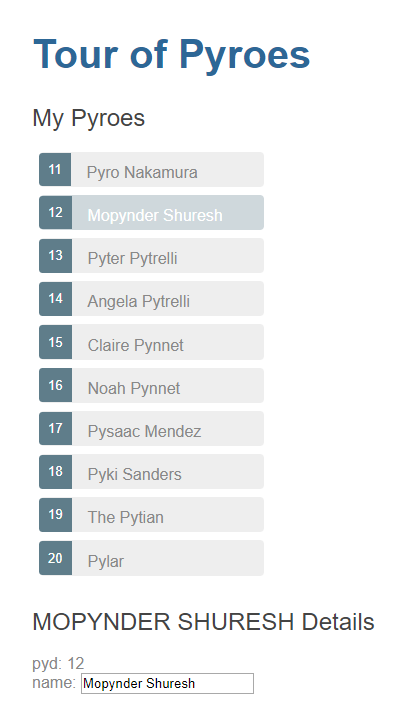
And making changes in the editor is automatically reflected not only in the
input field, but also in the uppercased name in the editor and in the list
of Pyroes
Notes
This example already shows how to mix and match the canonical ways to implement components in AnPyLar
As much as possible has been made in the HTML definition
But a
forloop is managed in the Python part of the component, as it does a lot more sense than scattering parts of the loop here and there and having special markers to decide when a loop is over and which things belong to the loop and which ones to the scope of the component (self)