Part 1 - Editing Pyroes
Component auto-generation
Having seen the basic layout of the application and how the basics of a Component look like, we can work our way up the ranks to create a Pyro Editor.
Copy the top0 folder to top1 and enter it. For example, with:
cp -r top0 top1
cd top1
Note
Under Windows and unless you have a proper shell installed (Cygwin, MSYS, GitBash, …) you are probably better off using the Windows Explorer to make a copy of the directory)
From inside the app directory create the skeleton for a Component:
cd app
anpylar-component Pyroes
Note
If the name of the component to add doesn’t end with Component, it will be automatically added
For small projects/components one can include the html content directly in the component. Let’s generate it automatically:
anpylar-component --htmlsheet Pyroes
The generated python code would look like this in each case
from .pyroes_component import PyroesComponent
from anpylar import Component, html


class PyroesComponent(Component):

    bindings = {}

    def render(self, node):
        pass
from anpylar import Component, html


class PyroesComponent(Component):

    htmlsheet = '''
    '''

    bindings = {}

    def render(self, node):
        pass
The addition of --htmlsheet has added an attribute with that name which
is a literal string in Python. We could then add the content as in:
htmlsheet = '''
<h1>My Heading 1</h1>
'''
In both cases the generated component is imported into __init__.py to make
it easy available for others to import it.
The layout
With our additions (let’s stick to having html content in a separate file), the layout looks like this
├── app
│   ├── pyroes
│   │   ├── __init__.py
│   │   ├── pyroes_component.css
│   │   ├── pyroes_component.html
│   │   └── pyroes_component.py
│   ├── __init__.py
│   ├── app_component.css
│   ├── app_component.html
│   └── app_module.py
├── anpylar.js
├── index.html
├── package.json
└── styles.css
├── app
│   ├── pyroes
│   │   ├── __init__.py
│   │   ├── pyroes_component.css
│   │   └── pyroes_component.py
│   ├── __init__.py
│   ├── app_component.css
│   ├── app_component.html
│   ├── app_module.py
│   └── pyro.py
├── anpylar.js
├── package.json
└── styles.css
Out of curiosity, had we applied the --htmlsheet command line switch, the
layout would miss one of the files: pyroes_component.html, because the html
content would be inside the component.
The Editor
A Pyro
Actually, and before editing we are going to define a Pyro. As you may have
seen in the layout above, we have added a pyro.py file to the app. Not
much is actually needed:
A
name(what’s a Pyro without one!)A
pydto make them unique in case two or more chose to bear the same names (yes even Pyroes could suffer from vanity!)
Add pyro.py to the hierarchy (let’s put the --htmlsheet aside for
simplicity)
├── app
│   ├── pyroes
│   │   ├── __init__.py
│   │   ├── pyroes_component.css
│   │   ├── pyroes_component.html
│   │   └── pyroes_component.py
│   ├── __init__.py
│   ├── app_component.css
│   ├── app_component.html
│   ├── app_module.py
│   └── pyro.py
├── anpylar.js
├── index.html
├── package.json
└── styles.css
And put some Python in action.
from anpylar import Model


class Pyro(Model):
    bindings = {
        'pyd': 0,
        'name': '',
    }
Uhmmm!!! The definition of the attributes is done in a dictionary named
bindings (remember it was also auto-generated above for the
PyroesComponent) and the class inherits from Model. Quick and dirty
explanation
Subclassing from
Modelallows the directivebindingsto take effect. Many of the classes in AnPyLar use this functionality (Componentbased classes do)The definitions inside
bindingswill have two effects:
Each instance will have an attribute with the name and default values defined in the dictionary. This will be valid code inside the class:
if self.pyd > 10:
    print('my name is:', self.name)
An additional attribute will be created and this will be an Observable which can be used to, obviously, observe the attribute.
The new attribute will be named:
self.pyd_
Note
AnPyLar has a built-in implementation of reactive programming following as closely as possible the RxJS/RxPY APIs. The initial set of operations is limited, but it will be expanded over time.
If you don’t know what an Observable is all about Reactive Programming. You may want to see: RxJS or the Python version at: RxPY.
Although this is a NOP (No Operation) class, we will later find several use cases for the observables and reactive programming.
Editing
With a Pyro in the hand, we can now complete the PyroesComponent and
the editor with it.
<h2 {name}="pyro.name_.map(lambda x: x.upper())">{name} Details</h2>
<div><span>pyd: </span><txt [pyro.pyd]>{}</txt></div>
<div>
    <label>name:
      <input *_fmtvalue=pyro.name_ placeholder="name"/>
    </label>
</div>
from anpylar import Component, html
from app.pyro import Pyro


class PyroesComponent(Component):

    bindings = {
        'pyro': Pyro(pyd=11, name='Pyro Nakamura')
    }

    def render(self, node):
        pass
from anpylar import Component, html
from .pyroes import PyroesComponent


class AppComponent(Component):

    title = 'Tour of Pyroes'

    bindings = {}

    def render(self, node):
        PyroesComponent()
Let’s focus on the specifics of the code parts from above.
pyroes_component.py
bindings = {
    'pyro': Pyro(pyd=11, name='Pyro Nakamura')
}
We added a binding and this is usable in the directives in the html code.
pyroes_component.html
As much as possible is being rendered with the AnPyLar directives, to avoid rendering in code. (Remember: this is known as htmlista mode). Notice one specific html tag:
<txt [pyro.pyd]>{}</txt>: an HTML tag named<txt>. This is a liberty taken by AnPyLar to be able to deliver.In this case and under
<div>there are two things: a<span>and text. Without putting the text to format inside another tag (<txt>) the supercharged method_fmtwould not know that it has only to format that.
<h2 {name}="pyro.name_.map(lambda x: x.upper())">{name} Details</h2>
As we mentioned before, the name inside Pyro would also have an
associated observable name_. You can apply observable operations to the
observable like in this case map(lambda x: x.upper()) which will uppercase
any text passed to it.
There is some extra magic there:
The node’s method
_fmtis subscribing to the Observable in the backgroundWhich means: any changes to
self.pyro.namewill be pushed through the observableself.pyro.name_, in turn through any operations (ourmap(...) and then delivered to the subscriber, i.e.:_fmt, which has been invoked with the directive in<h2 {name} ...And the node will react to the changes automatically updating the screen in real time.
Notice how we don’t use the Observable when putting the pyd on the
screen.
<div><span>pyd: </span><txt [pyro.pyd]>{}</txt></div>
And that’s because the pyd is not going to be edited. It won’t change
during the lifecycle of the component. The binding will simply take the current
face value and put it once on screen.
For the input field
<input *_fmtvalue=pyro.name_ placeholder="name"/>
Once again, we are using the observable and passing it to a supercharged method
named _fmtvalue with the * directive syntax, which does the following:
Subscribe to an observable if one is passed and format the changes in to the value field.
Publish the changes back to the underlying observed attribute (
self.pyro.namewithout the_) when something is edited
app_component.py
Having a finished PyroesComponent is nice, but it wouldn’t be of any use if
we are not starting it. We’ll do that inside our main AppComponent. There
are actually different ways of doing it. For the sake of it, we just
instantiate it.
def render(self, node):
    PyroesComponent()
Let’s see what our editor delivers. First serve the application:
anpylar-serve top1
And go the browser
Which will deliver this.
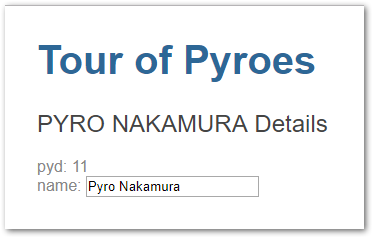
If we use the backspace key to delete part of the name, this is the result
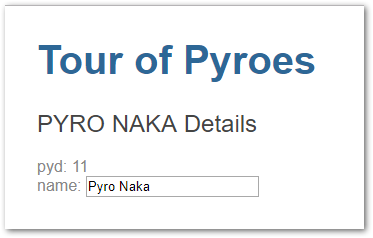
Blistering barnacles!!! The changes in the input field are automatically propagated to the name displayed above it. All thanks to reactive programming and having it integrated in AnPyLar
Sub-Component Rendering Notes
PyroesComponent is being instantiated inside AppComponent and as such
it is a Sub-Component or Child-Component. There are several properties, but
let’s concentrate in this tutorial in two aspects.
Actual DOM Rendering
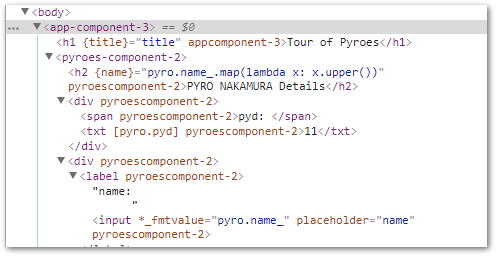
Nothing surprising here: PyroesComponent has generated a
<pyroes-component-2> HTML tag and when rendering this has been placed in
the DOM as a child of <app-component-3>
Further nesting sub-components is of course possible, with no actual hard limits set anywhere.
Note
The previous chapter of the tutorial had the tag <app-component-2> for
the AppComponent, whilst this is now <app-component-3>.
The extra -x is calculated each time and depends on class creation order
(import order) Never count on it to be fixed, because it won’t be.
Sub-Component Rendering
As mentioned above, there are different ways to have PyroesComponent render
inside the AppComponent. Let’s list them
# This is the one we used above. Just instantiate the component
# inside the ``render`` method

def render(self, node):
    ...
    PyroesComponent()
# Tell it to output its selector

def render(self, node):
    ...
    PyroesComponent.selector_render()
# If the selector of the component is known in advance
# (it has for example been manually set)

from anpylar import html

...

def render(self, node):
    ...

    html._tag('my-selector')
<!-- For known selectors, you can place the selector in the HTML content
and the component will be automatically instantiated and rendered -->

<h1>some h1 content here</h1>
<my-selector></my-selector>
<p>Paragraph content</p>
Take into account:
For the Manual and HTML methods, the component has to be imported somewhere. If the component which has to be instantiated is never imported, there will be no relationship between the component and the DOM node with the same selector name.
From a practical point of view, if the file containing the Python code is never imported is just like a text file, with no meaning.
Observables as callbacks
The reactive extensions implementation in AnPyLar has chosen to make
certain observables also callables. Specifically those that are created in
the bindings directive. As in
class PyroesComponent(Component):

    ...
    bindings = {
    'pyro': Pyro(pyd=11, name='Pyro Nakamura')
    }
which allows later the following
def render(self, node):
    ...
    node.select('input')._fmtvalue(self.pyro.name_)
def render(self, node):
    ...
    html.input(placeholder='name')._fmtvalue(self.pyro.name_)
<input *_fmtvalue=pyro.name_ placeholder="name"/>
Here the Observable doubles as the callback to which the value will be
published when it changes in the input field. This means effectively that:
self.pyro.name_(some_value) # is equal to: self.pyro.name = some_value
Although for this short tutorial sample it doesn’t play a big role, it can do so when using it as a callable subscribing to another observable, for example.